Making SLP Videos is a great way to show your parents and the world of speech language pathology everything that we have been up to.
In our office we have been:
- Sharing slp videos with each other to help out with therapy
- Sending quick updates to parents about what we are doing in therapy or about their child’s progress
- Creating speech therapy videos to share out on social media
- Answering SLP Questions through video
- And even – treating children in other countries! Ooohh!!
Don’t know anything about making SLP videos? You’re in the right place.
This information is intended to get everyone with a message to share who has no experience making a video or might even be scared to make a video.
It’s also for those of you who have done this before. We have produced dozens of videos and over 60 online courses. Here are the most important tips to get you up and running.
Easily Making SLP Videos to Share with SLPs and Families
Instructions for Apple/Mac: iMovie Basics: Video editing tutorial for beginners
7 Tips for Easy – Fast – Free Speech Pathology Video Creation
1. Don’t Turn Your Camera Off
If you make mistakes, keep rolling! Turning your camera off and on takes up a lot of time and can make you more-and-more nervous. Just roll with it and cut out the bad stuff later.
2. Clap Your Hands After You Mess Up
Clapping your hands causes the audio to spike so that you can see where your mistake was. It makes it really easy to edit those parts out.
3. Smile for a Few Seconds Before You Start Talking
If you smile and hold your smile for two seconds before you begin to talk, it is easier to find a frame you like to begin with.


4. Add a Title Slide or Beginning Statement
Let’s face it, we really don’t want to invest our time into a video if we don’t know what it is about. While it breaks our story-telling hearts, we need to begin by saying EXACTLY what the video is about.
“This is a two-minute video that will show you how X, Y, & Z.”
5. Use Transition Slides to Cover-Up Bad Transitions
If you cut out a section you don’t want. You can spend hours trying to make the pieces fit together or make your face not look weird. Throw a transition action life Fading or a screen with a title between the breaks: “Next, How to Teach Following Directions”
6. Keep them short!
Research from Vimeo, Youtube, and Facebook indicates that there is a big drop-off in watching after three minutes. This is permission for us to keep it short!
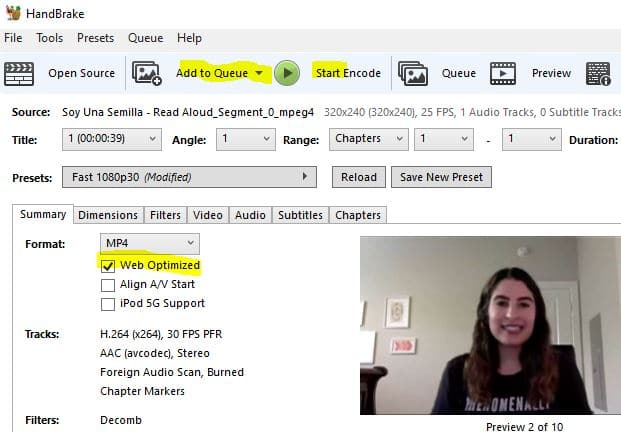
7. Shrink Your Video Using Handbrake.
Handbrake is a free program that you can download to your computer to reduce the size of the video. Open the video in Handbrake, click Web Optimized, click Add to Queue, and click Start Queue

Now get out there and show your parents and the world everything that you have been doing to improve communication!
Read more:


